How to Install an Electric Car Charging Station
As more and more people are converting to electric cars and plug-in hybrid vehicles, the truth about the electric vehicle is becoming widespread—as it is becoming increasingly clear that electric cars are more sustainable, cheaper to maintain and operate, and provide an electrifying driving experience. Still, questions remain amongst new and prospective EV drivers about EVs and EV charging, such as:
• How far can you travel on one charge? (up to 520 miles)
• How long does it take to recharge? (less than 2 hours with newer rapid chargers)
Because of these two questions, any EV owner constantly deals with the problem of finding the nearest public charging station. Do you know where to charge an electric car that’s nearest to your home? Naturally, the next question that occurs is:
• How complicated is it to set up your home for electric and hybrid vehicles?
Now with easy-to-install smart charging stations like the JuiceBox, the answer to the final question is emphatic: It’s not complicated at all!
This article will detail what you need to know about the installation process, including the installation prerequisites.
Let’s dive in.
Installation Prerequisites | Before You Get Started
First, you’ll need to have your garage, driveway, or parking arrangement set up with the proper electrical connections and circuit breakers to run the JuiceBox. This includes having either of the following EV charging equipment:
• NEMA 14-50 outlet
• Hardwired electrical connection
From there, you’ll need a circuit breaker rated for 125% of the device’s electrical load. For the JuiceBox, the wiring and circuit requirements are as follows:
Wiring And Circuit Requirements
| 32A | 40A | 80A | |
|
Output Power |
32A Max 7.7 kW at 240V 1-phase |
40A Max 9.6 kW at 240V 1-phase |
80A Max 19.2kW at 240V 1-phase |
|
Circuit Requirements
|
40 Amp 2 pole breaker |
50 Amp 2 pole breaker |
100 Amp 2 pole breaker |
|
Recommend Wiring |
#8AWG or larger gauge copper wires for the conductors (NEC 625.17(A)(2) #10AWG Green or bare copper for the ground conductor (no NEU) |
#6AWG or larger gauge copper wires for the conductors (NEC 625.17(A)(2) #10AWG Green or bare copper for the ground conductor (no NEUTRAL is used) |
#2 or 3AWG or larger gauge copper wires for the conductors (NEC 625.17(A)(2) #6AWG Green or bare copper for the ground conductor (no NEU) |
To perform optimally, you’ll need to ensure the JuiceBox EV charger is also placed properly. Keep these tips in mind when choosing where to install your smart charging station:
• Install within reach of where you normally park your vehicle (and the on the same side as the vehicle’s charging port)
• Avoid distances from the smart charging station to vehicle that would cause strain on the cable
•Install within range of your Wi-Fi network
• Keep sufficient clearance around your JuiceBox:
24 to 48 inches above the floor if you’re mounting indoors
18 to 48 inches above the ground if you’re mounting outdoors
Following these initial requirements will ensure a smooth and simple installation process.
The Installation Process | DIY
The JuiceBox installation process is a bit like building Ikea furniture (mixed with extremely important wiring and high-powered electronics to charge your 1-ton vehicle). As long as you follow all these steps, you’ll be sure to find the installation process for your JuiceBox simple and straightforward. However, always be cautious when dealing with electrical wiring:
• When dealing with installing electronics, be sure to overview the safety information provided.
Going from a dead battery to a fully-operational EV charging station is as easy as following these steps:
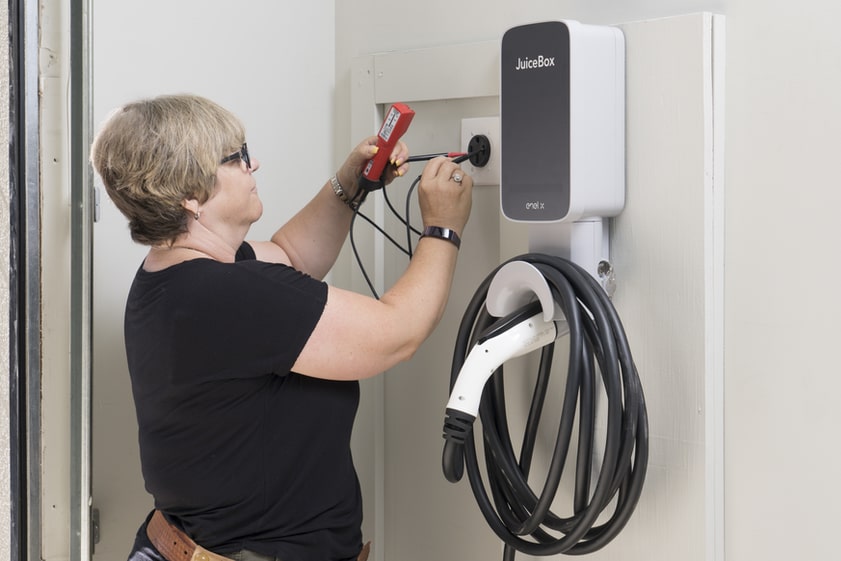
1. Before installing, ensure that the circuit breaker connected to the NEMA 14-50 or hardwired electrical connection is turned OFF.
Use a stud sensor to determine an appropriate mounting location, then use the 2 screws to secure the wall bracket.Use a beam level to ensure that the bracket is level horizontally before securing both sides.
2. Secure the enclosure bracket onto the back of the Juice Box using the enclosure screws provided.
3. Simply hang the JuiceBox onto the wall bracket secured in step 2.
If the JuiceBox does not hang securely, adjust the screws that were installed previously
4. Connect the JuiceBox to the appropriate hardwired connections as detailed in the instruction manual.
5. Once properly connected, turn the circuit breaker ON and wait 10 seconds. Confirm the JuiceBox is powered by finding the solid green “Power” indicator light on.
The final step is to plug the charging cable into your EV charging port and start charging up. Congratulations! You've just set up your own home charging station. If you are a property owner, you should also consider installing an EV charger at your apartment complex.
Charge Up Your Day
Having your own EV charging station at home saves you the trouble of looking for a public charging station. We hope that by following this simple guide for how to install your electric car charging station, you can be comforted by the fact that you’re charging your car safely and correctly.
Charge up your new electric vehicle and electrify your day!